
Set Up the AI Workflow Framework Skills
Seven skills and an agent implementing the AI Workflow Framework — from analyzing where AI fits in your workflows through building, testing, running, and improving working AI workflows. This page gets them into the AI tool you already use.
Set Up These Skills
Section titled “Set Up These Skills”Which one are you?
Section titled “Which one are you?”Pick the row that matches the tool you use most, then jump to that section. Nothing on the “For everyone” paths needs a terminal or any technical setup.
| I use… | Do this |
|---|---|
| Claude (claude.ai or the Claude app) | Install the plugin — or upload the ZIPs if your company blocks plugins or you’re on the Free plan. About 3 minutes, no terminal. |
| ChatGPT | Install the plugin on any paid plan — or upload the ZIPs if you don’t see Add marketplace. About 3 minutes, no terminal. |
| Google Gemini | Upload the ZIPs in Gemini Spark (personal account) or Gemini Enterprise (work account). About 3 minutes, no terminal. |
| Microsoft 365 Copilot | Upload the ZIPs in Cowork. About 5 minutes, no terminal. |
| A code editor or terminal (Claude Code, Cursor, Codex CLI, Gemini CLI, Antigravity) | See For builders at the bottom. A couple of commands or a folder on disk. |
For everyone (chat & desktop apps)
Section titled “For everyone (chat & desktop apps)”Claude — Chat & Cowork (claude.ai and the Claude app) — no terminal, ~3 minutes
Claude has three places to work. Chat is the normal conversation, on the web or in the Claude app. Cowork is the tab in the Claude app where Claude works on files and folders on your computer. Code is for developers — skip it unless you’re a builder (see Claude Code below). The skills work in Chat and Cowork; only the optional framework-agent orchestrator needs Cowork.
Official docs: Use plugins in Claude · Use skills in Claude
What you need first: A Claude account. Installing the plugin (Option 1) needs a paid plan — Pro, Max, Team, or Enterprise. Uploading the ZIPs (Option 2) also works on the Free plan.
Step 1 — Turn on code execution (one time)
- Open claude.ai in your browser, or open the Claude app
- Click the gear icon (⚙️) in the bottom-left corner to open Settings
- Click Capabilities
- Make sure the toggle next to Code execution and file creation is on (blue)
This lets Claude run skills — it does not give Claude access to your computer. On a Team or Enterprise plan, an admin turns this on for everyone under Organization settings → Skills; if the toggle isn’t there, ask them.
Option 1 — Install the plugin (recommended)
Section titled “Option 1 — Install the plugin (recommended)”Before you start: In the left sidebar, click Customize. Do you see a Plugins tab? Yes → continue. No → you’re on the Free plan, or your company has turned personal plugins off. Use Option 2 below instead; it works on every plan.
- In the left sidebar, click Customize
- Click the Plugins tab
- Click the + button, then Add marketplace
- Choose Add from a repository
- In the field, type
jamesgray-ai/handsonai-plugins - A message may appear saying “Couldn’t load the repository list. Type owner/repo below to continue.” — that’s harmless. Click the “Use ‘jamesgray-ai/handsonai-plugins’” option that appears below it.
- Click Sync
- You’ll now see a handsonai plugin card. Click Install.
You’ll know it worked when: the handsonai card shows as installed, and when you start a new chat and type
Help me analyze AI workflow opportunities
Claude begins a short interview — asking about your role and the work you do most often — instead of giving a generic answer. In Cowork you can also type / to see the skills listed, and the framework-agent orchestrator is available there.
Option 2 — Upload the skill ZIPs
Section titled “Option 2 — Upload the skill ZIPs”Use this if your plan or company doesn’t allow plugins, or if you only want one or two skills.
Before you start: Step 1 (code execution) is done, and you can see Customize → Skills in the left sidebar — it’s there on every plan.
- Download analyze.zip from the skill downloads table below (start with Analyze — it’s Step 1 of the framework). It lands in your Downloads folder. Don’t unzip it.
- In Claude, click Customize in the left sidebar, then Skills
- Click the + button, then Create skill
- Click Upload a skill and choose
analyze.zip - Find analyze in your Skills list and make sure its toggle is on (blue)
- Repeat for the next skill you need — Deconstruct is Step 2. You don’t need all seven today.
You’ll know it worked when: you start a new chat, type “Help me analyze AI workflow opportunities”, and Claude begins the interview. Uploaded skills appear in both Chat and Cowork on your account. The framework-agent orchestrator isn’t available this way — it’s plugin-only.
If it didn’t work:
- Did you start a new chat after installing?
- Is the skill’s toggle on (Customize → Skills)?
- Is Code execution and file creation on (Settings → Capabilities)?
- Did you upload the ZIP without unzipping it?
- Still stuck? Anthropic lists the common upload errors in Use skills in Claude, and plugin questions in Use plugins in Claude.
ChatGPT & Codex (the ChatGPT app) — no terminal, ~3 minutes
The ChatGPT app (Mac, Windows, and Linux) has three modes: Chat, Work, and Codex. Skills run in Work — the toggle above the message box — and in the Codex tab (plugin skills work in Chat too). Codex is the developer mode; you don’t need it for this course, but the same skills work there.
Official docs: Skills in ChatGPT · Skills & Plugins
What you need first: A ChatGPT account and the ChatGPT app (Mac, Windows, or Linux). Skills from the plugin also work on chatgpt.com and your phone; uploaded skills work in the app. Installing the plugin (Option 1) needs a paid plan — Plus, Pro, Business, or Enterprise. Uploading the ZIPs (Option 2) also needs a paid plan (not Free or Go). On Enterprise and Edu, skills are off until an admin turns them on.
Option 1 — Install the plugin (recommended)
Section titled “Option 1 — Install the plugin (recommended)”Before you start: In the left sidebar, click Plugins. Do you see an Add marketplace option? Yes → continue. No → you’re on Free or Go, or your company manages plugins centrally. Use Option 2, or send your admin the For admins note below.
- In the left sidebar, click Plugins
- Click Add marketplace
- In the field, type
jamesgray-ai/handsonai-plugins - Click Add (or Sync)
- You’ll now see a Hands-on AI plugin. Click the + button to install it.
You’ll know it worked when: you switch to Work (the toggle above the message box), type @ and start typing analyze, and the skill appears in the list. Pick it and send
Help me analyze AI workflow opportunities
ChatGPT begins a short interview about your role and the work you do most often. In the Codex tab, type $analyze instead.
Option 2 — Upload the skill ZIPs
Section titled “Option 2 — Upload the skill ZIPs”Use this if you don’t see Add marketplace (your company manages plugins), or if you only want one or two skills.
Before you start: Click Plugins in the left sidebar, then the Skills tab. Do you see a Create button? Yes → continue. No → you’re on Free or Go, or your admin hasn’t turned Skills on (Enterprise and Edu are off by default). On Free or Go, skills aren’t available in ChatGPT chat — the Codex tab can still use them from a folder on your computer; see OpenAI Codex under For builders.
- Download analyze.zip from the skill downloads table below. Don’t unzip it.
- In ChatGPT, click Plugins in the left sidebar, then the Skills tab
- Click Create, then Upload from your computer
- Choose
analyze.zip - Repeat for the next skill you need — Deconstruct is Step 2
You’ll know it worked when: in Work, you type @analyze, pick the skill, send “Help me analyze AI workflow opportunities”, and ChatGPT begins the interview.
Where they work, in OpenAI’s words: “Standalone skills are available in the ChatGPT desktop app, Codex CLI, and IDE extension. Skills bundled in plugins are also available in Chat and Work across ChatGPT on the web, desktop, and mobile.” So uploaded skills stay in the app and Codex; the plugin’s skills also work on the web and your phone.
If it didn’t work:
- Try Work mode — that’s where skills always run.
- Did you pick the skill with
@, or ask for the task in plain words? - Did you upload the ZIP without unzipping it?
- Still stuck? OpenAI’s Plugins in ChatGPT and Codex covers who can install what, and Using Codex with your ChatGPT plan covers what each plan includes.
Google Gemini (Gemini Spark or Gemini Enterprise) — no terminal, ~3 minutes
Gemini has two versions with skills. Which one you have depends on your Google account: a personal Google Account (gmail.com) uses Gemini Spark; a work or school account uses Gemini Enterprise, if your company has it. The skill files are the same either way. (Using Gemini CLI or Antigravity instead? See Gemini CLI / Antigravity under For builders.)
Official docs: Create & manage skills for Gemini Apps · Gemini Spark · Gemini Enterprise skills
Option 1 — Gemini Spark (personal Google Account)
Section titled “Option 1 — Gemini Spark (personal Google Account)”What you need first: A personal Google Account (work and school accounts can’t use Spark), a Google AI Pro or Ultra subscription, and you need to be 18 or older. Spark isn’t available in the European Economic Area, the United Kingdom, Switzerland, or Nigeria.
Before you start: Open gemini.google.com and sign in with your personal account. Look in the sidebar. Do you see Switch to Spark? Yes → continue. No → check the requirements above.
- Download analyze.zip from the skill downloads table below. Don’t unzip it.
- In the Gemini sidebar, click Switch to Spark
- Click Skills
- Click Upload and choose
analyze.zip - The new skill appears in your list. If it shows as disabled, click More (⋮) next to it, then Enable
- Repeat for the next skill you need — Deconstruct is Step 2
The same steps work in the Gemini app for Mac and in the Gemini app on your phone once Spark is on.
You’ll know it worked when: you start a task, type / and pick analyze (or just describe the task — Spark picks the skill automatically), send “Help me analyze AI workflow opportunities”, and Gemini begins a short interview about your role and your work.
To update a skill later: Skills → More (⋮) next to the skill → Replace skill → choose the new ZIP. To remove one: More → Delete.
Option 2 — Gemini Enterprise (work or school account)
Section titled “Option 2 — Gemini Enterprise (work or school account)”Before you start: Open your company’s Gemini Enterprise web app. Do you see Skills in the left navigation, with a + button? Yes → continue. No → your edition (Frontline) or your admin’s settings don’t allow uploads. Ask your admin to upload the skills and share them with you.
- Download analyze.zip from the skill downloads table below. Don’t unzip it. (Google’s documentation asks for
SKILL.mdat the top level of the ZIP — if the upload is rejected, use analyze-flat.zip from the same table.) - In Gemini Enterprise, click Skills in the left navigation
- Click the + button, then Upload skill
- Drag in
analyze.zip(or browse for it), then click Import - Repeat for the next skill you need
You’ll know it worked when: you type @analyze or /analyze in a chat (or just describe the task), send “Help me analyze AI workflow opportunities”, and Gemini begins the interview. Note that Gemini Enterprise skills don’t run inside its Agents — use them in chat.
If it didn’t work:
- Spark: are you signed in with a personal account, on Google AI Pro or Ultra?
- Is the skill enabled in the Skills list?
- Did you upload the ZIP without unzipping it? If the ZIP is rejected, download the flat version of the skill from the downloads table instead.
- Still stuck? Google’s Gemini Spark page covers the account and region rules, and Gemini Enterprise skills covers editions and admin settings.
Microsoft 365 Copilot (Copilot Cowork) — no terminal, ~5 minutes
Microsoft 365 Copilot runs skills in Copilot Cowork. Cowork reads SKILL.md files from a folder in your OneDrive, and there’s an Upload skill button that puts them there for you.
Official docs: Cowork skills (Microsoft Learn) · Upload a skill
What you need first: A Microsoft 365 Copilot license, and your admin must have enabled Cowork (it’s generally available, but it uses usage-based billing that an admin turns on). Custom skills aren’t available in Cowork on mobile.
Before you start: Open Microsoft 365 Copilot. Do you see Cowork in the left navigation? Yes → continue. No → ask your IT admin to enable Cowork.
Option 1 — Upload the skill
Section titled “Option 1 — Upload the skill”- Download analyze.zip from the skill downloads table below. Don’t unzip it. (Microsoft’s documentation describes a ZIP with
SKILL.mdat the top level — if the upload is rejected, use analyze-flat.zip from the same table, or Option 2.) - Open Cowork
- In the left navigation, click Customize
- Click the Skills tab
- Click the small arrow next to Add, then Upload skill
- Choose
analyze.zip. Cowork checks the file and saves it to your OneDrive; the skill appears under Your skills after a few moments. - Repeat for the next skill you need — Deconstruct is Step 2
If Cowork rejects the ZIP, download the flat version of the skill from the downloads table and upload that instead, or use Option 2.
Option 2 — Put the skill folder in OneDrive yourself
Section titled “Option 2 — Put the skill folder in OneDrive yourself”- Download analyze.zip and double-click it — this creates a folder called
analyzenext to it - Open OneDrive:
- Windows: open File Explorer → click OneDrive in the left sidebar
- Mac: open Finder → click OneDrive in the sidebar (install the OneDrive app if needed)
- Browser: go to onedrive.live.com and sign in with your work account
- Open Documents, then Cowork, then skills — create any of those folders that don’t exist yet
- Move the
analyzefolder in. The full path should beDocuments/Cowork/skills/analyze/SKILL.md - Repeat for the next skill you need
You’ll know it worked when: you start a new Cowork conversation, type “Help me analyze AI workflow opportunities”, and Cowork begins the interview. The skill shows up as a chip in the side panel under Skills.
If it didn’t work:
- Did you start a new Cowork conversation after adding the skill?
- Is the folder name lowercase and exactly
Documents/Cowork/skills/? - Did you wait a few moments for OneDrive to sync?
- Still stuck? Microsoft’s Customize Copilot Cowork page covers upload limits and the Skills tab.
Download the Skill ZIPs
Section titled “Download the Skill ZIPs”Every “download the skill” step above means: click the link in this table. The file downloads immediately, usually to your Downloads folder. Don’t unzip it for Claude, ChatGPT, Gemini, or Copilot — upload the ZIP as-is.
You don’t need all seven today. Analyze and Deconstruct are enough to start; add the rest as you progress through the framework.
| Framework step | Skill | Download |
|---|---|---|
| 1 | Analyze | analyze.zip |
| 2 | Deconstruct | deconstruct.zip |
| 3 | Design | design.zip |
| 4 | Build | build.zip |
| 5 | Test | test.zip |
| 6 | Run | run.zip |
| 7 | Improve | improve.zip |
Was your ZIP rejected? Try the flat version
Some platforms want the skill’s SKILL.md file at the top level of the ZIP rather than inside a folder. If an upload is rejected, download the same skill with -flat in the name — identical content, different packaging:
| Skill | Flat download |
|---|---|
| Analyze | analyze-flat.zip |
| Deconstruct | deconstruct-flat.zip |
| Design | design-flat.zip |
| Build | build-flat.zip |
| Test | test-flat.zip |
| Run | run-flat.zip |
| Improve | improve-flat.zip |
Doing the knowledge-graph lab? building-knowledge-graph.zip is the one skill you need. See Knowledge Graph setup.
Doing the registry lab? The two registry skills are on the same page: scaffolding-registry.zip sets up your AI Registry, and indexing-registry.zip keeps it tidy. See AI Registry setup.
Want to see everything? The download page on GitHub lists every file. The newest release is at the top — click Assets to expand the list. (The framework-agent orchestrator isn’t a download; it’s installed automatically with the plugin.)
For builders (code editors & terminal)
Section titled “For builders (code editors & terminal)”Use AI through a code editor or terminal? These paths use a couple of commands or a folder on disk.
Claude Code (terminal, or the Code tab in the Claude app) — two commands
Claude Code has full plugin support. Two commands install all seven skills plus the framework-agent orchestrator and the /handsonai: slash commands.
Official docs: Extend Claude with Skills · Discover and Install Plugins
What you need first: Claude Code running in your terminal, or the Claude app with the Code tab. If you haven’t installed Claude Code yet, see the Claude Code setup guide. Claude Code needs a paid Claude plan.
Step 1 — Add the marketplace (one time)
Type this into Claude Code and press Enter:
/plugin marketplace add jamesgray-ai/handsonai-pluginsStep 2 — Install the plugin
/plugin install handsonai@handsonaiStep 3 — Check it worked
Type /plugin list and press Enter. You should see handsonai with its skills. Then type /handsonai:analyze — the Analyze skill starts and begins asking you questions. You can also just describe what you need in plain words and Claude picks the skill.
Prefer clicking? The visual way in the Claude app
- Open the Claude app and click the Code tab at the top
- In the left sidebar, click Customize, then Browse plugins
- Click the Personal tab, then + → Add marketplace
- Type
jamesgray-ai/handsonai-plugins. If a “Couldn’t load the repository list” message appears, click “Use ‘jamesgray-ai/handsonai-plugins’” — the warning is harmless. - Click Sync, then Install on the handsonai card
For updates, uninstalling, and troubleshooting, see Using Plugins.
Cursor — a folder in your project
Cursor reads skill files from your project folder automatically.
Official docs: Agent Skills — Cursor
What you need first: Cursor installed and a project folder open. If you haven’t installed Cursor yet, see the Editor Setup guide. Your project root is the top-level folder you have open in Cursor — that’s where Cursor looks for skills.
Step 1 — Download and unzip a skill
- Download analyze.zip from the skill downloads table above
- Find it in your Downloads folder and double-click it — this creates a folder called
analyze
Step 2 — Create the skills folder in your project
- Open your project folder in Finder (Mac) or File Explorer (Windows)
- Create a folder called
.agents, and inside it a folder calledskills. You should now haveyour-project/.agents/skills/
Step 3 — Move the skill folder in
Move the analyze folder into .agents/skills/. You should now have your-project/.agents/skills/analyze/SKILL.md.
Step 4 — Restart Cursor and test
Close and reopen Cursor (or reopen the project). In Cursor’s chat, type “Use the analyze skill to help me find AI workflow opportunities.”
You’ll know it worked when: Cursor begins the structured interview about your role and your work instead of answering generically.
If it didn’t work: check the path is exactly your-project/.agents/skills/analyze/SKILL.md (not analyze/analyze/…), that the project you have open is the one with the folder, and that you reopened Cursor after adding it.
Repeat Steps 1 and 3 for each skill you need.
OpenAI Codex (CLI, the Codex tab in the ChatGPT app, or the IDE extension) — a folder on disk
Codex reads skill folders from disk. This path works on every ChatGPT plan, including Free, and it’s how you get the skills into Codex without uploading them. (Installing the plugin from the ChatGPT section above also puts the skills into the Codex tab of the ChatGPT app — but plugins don’t load in the IDE extension, so use this folder path there.)
Official docs: Build skills — Codex
What you need first: Codex — the CLI, the Codex tab in the ChatGPT app, or the IDE extension. If you haven’t set it up, see Getting Started with OpenAI.
Step 1 — Download and unzip a skill
- Download analyze.zip from the skill downloads table above
- Double-click it in your Downloads folder — this creates a folder called
analyze
Step 2 — Put it where Codex looks
Codex reads skills from a personal folder that works in every project, or from a folder inside one project. Pick one:
- Everywhere (recommended): move the
analyzefolder into.agents/skills/inside your home folder — so the path is~/.agents/skills/analyze/SKILL.md. From a terminal:mkdir -p ~/.agents/skillsfirst if the folder doesn’t exist. - One project only: move it into
.agents/skills/at the top of that project —your-project/.agents/skills/analyze/SKILL.md. From a terminal in the project:mkdir -p .agents/skills.
Step 3 — Test it
Open Codex and type $ — the skills appear in a list. Pick analyze, or say “Use the analyze skill to help me find AI workflow opportunities.” Type /skills to see everything Codex has loaded.
You’ll know it worked when: analyze appears in the $ list and Codex begins the structured interview.
If it didn’t work: check the path ends in .agents/skills/analyze/SKILL.md, start a new Codex thread (skills load at the start of a thread), and make sure the folder is in your home folder or in the project you have open.
Repeat Steps 1–2 for each skill you need.
Install the whole plugin from the terminal instead
With the Codex CLI installed, two commands add all the skills at once — the same plugin the ChatGPT app installs:
codex plugin marketplace add jamesgray-ai/handsonai-pluginscodex plugin add handsonai@handsonaiStart a new Codex thread afterwards so it picks the skills up.
Gemini CLI / Antigravity — a folder in your project
Google’s developer tools — Gemini CLI (command line) and Antigravity (AI-native IDE) — read skill folders from your project automatically. (Using the Gemini app or Gemini Enterprise instead? See Google Gemini under For everyone.)
Official docs: Agent Skills — Gemini CLI · Getting Started with Antigravity Skills
What you need first: Gemini CLI or Antigravity installed. See Getting Started with Google Gemini for Gemini CLI, or download Antigravity from antigravity.google. Your project root is the top-level folder you’re working in.
Step 1 — Download and unzip a skill
- Download analyze.zip from the skill downloads table above
- Double-click it in your Downloads folder — this creates a folder called
analyze
Step 2 — Create the skills folder in your project
In your project folder, create .gemini/skills/. From a terminal:
mkdir -p .gemini/skillsOr in Finder / File Explorer: create a folder called .gemini inside your project, then skills inside that.
Step 3 — Move the skill folder in
Move analyze into .gemini/skills/ (or .agents/skills/). You should now have your-project/.gemini/skills/analyze/SKILL.md.
Step 4 — Test it
Open the project in Gemini CLI or Antigravity and say “Use the analyze skill to help me find AI workflow opportunities.” Skills are discovered automatically.
You’ll know it worked when: Gemini begins the structured interview about your role and your work.
If it didn’t work: check the path ends in skills/analyze/SKILL.md, that you started the tool from (or opened) the project that has the folder, and restart Antigravity if it was already open.
Repeat Steps 1 and 3 for each skill you need.
Using a different tool (VS Code Copilot, Perplexity, or another platform)? See How to Add Skills to Your Platform. For a full comparison of platforms — where skills run, what they can access — see Platform Implementations.
If you’re stuck
Section titled “If you’re stuck”Work out which of three things is wrong, then go to the right place:
| The problem is… | Go to |
|---|---|
| The download — a link 404s, a ZIP won’t open | The download page on GitHub — the newest release is at the top; click Assets. If a file is missing there, open an issue. |
| The platform — a menu isn’t where this page says, an upload is rejected, a plan question | The vendor’s own help page, linked at the top of each section above (Anthropic, OpenAI, Google, Microsoft). Their pages change faster than ours; if a label differs, trust the screen. |
| The skill — it installed but does something odd | The skill’s own page: Analyze, Deconstruct, Design, Build, Test, Run, Improve. Course students: ask in the course channel. |
Update the Skills
Section titled “Update the Skills”Skills and the framework-agent evolve as the methodology improves — new skills get added, prompts get refined, reference material gets sharper. You don’t need to check for updates yourself: changes are announced in the changelog, and the release notes on GitHub list exactly what changed.
Claude — Chat & Cowork
If you installed the plugin: updating is a two-step process — the marketplace and the installed plugin are tracked separately, so checking for updates is not the same as installing them.
- Customize → Plugins, click the … menu on the
handsonai-pluginsmarketplace and choose Check for updates. This pulls the latest version from GitHub. - Open the handsonai plugin in your plugins list and click Update in the top-right. The new skills are available immediately — no restart needed.
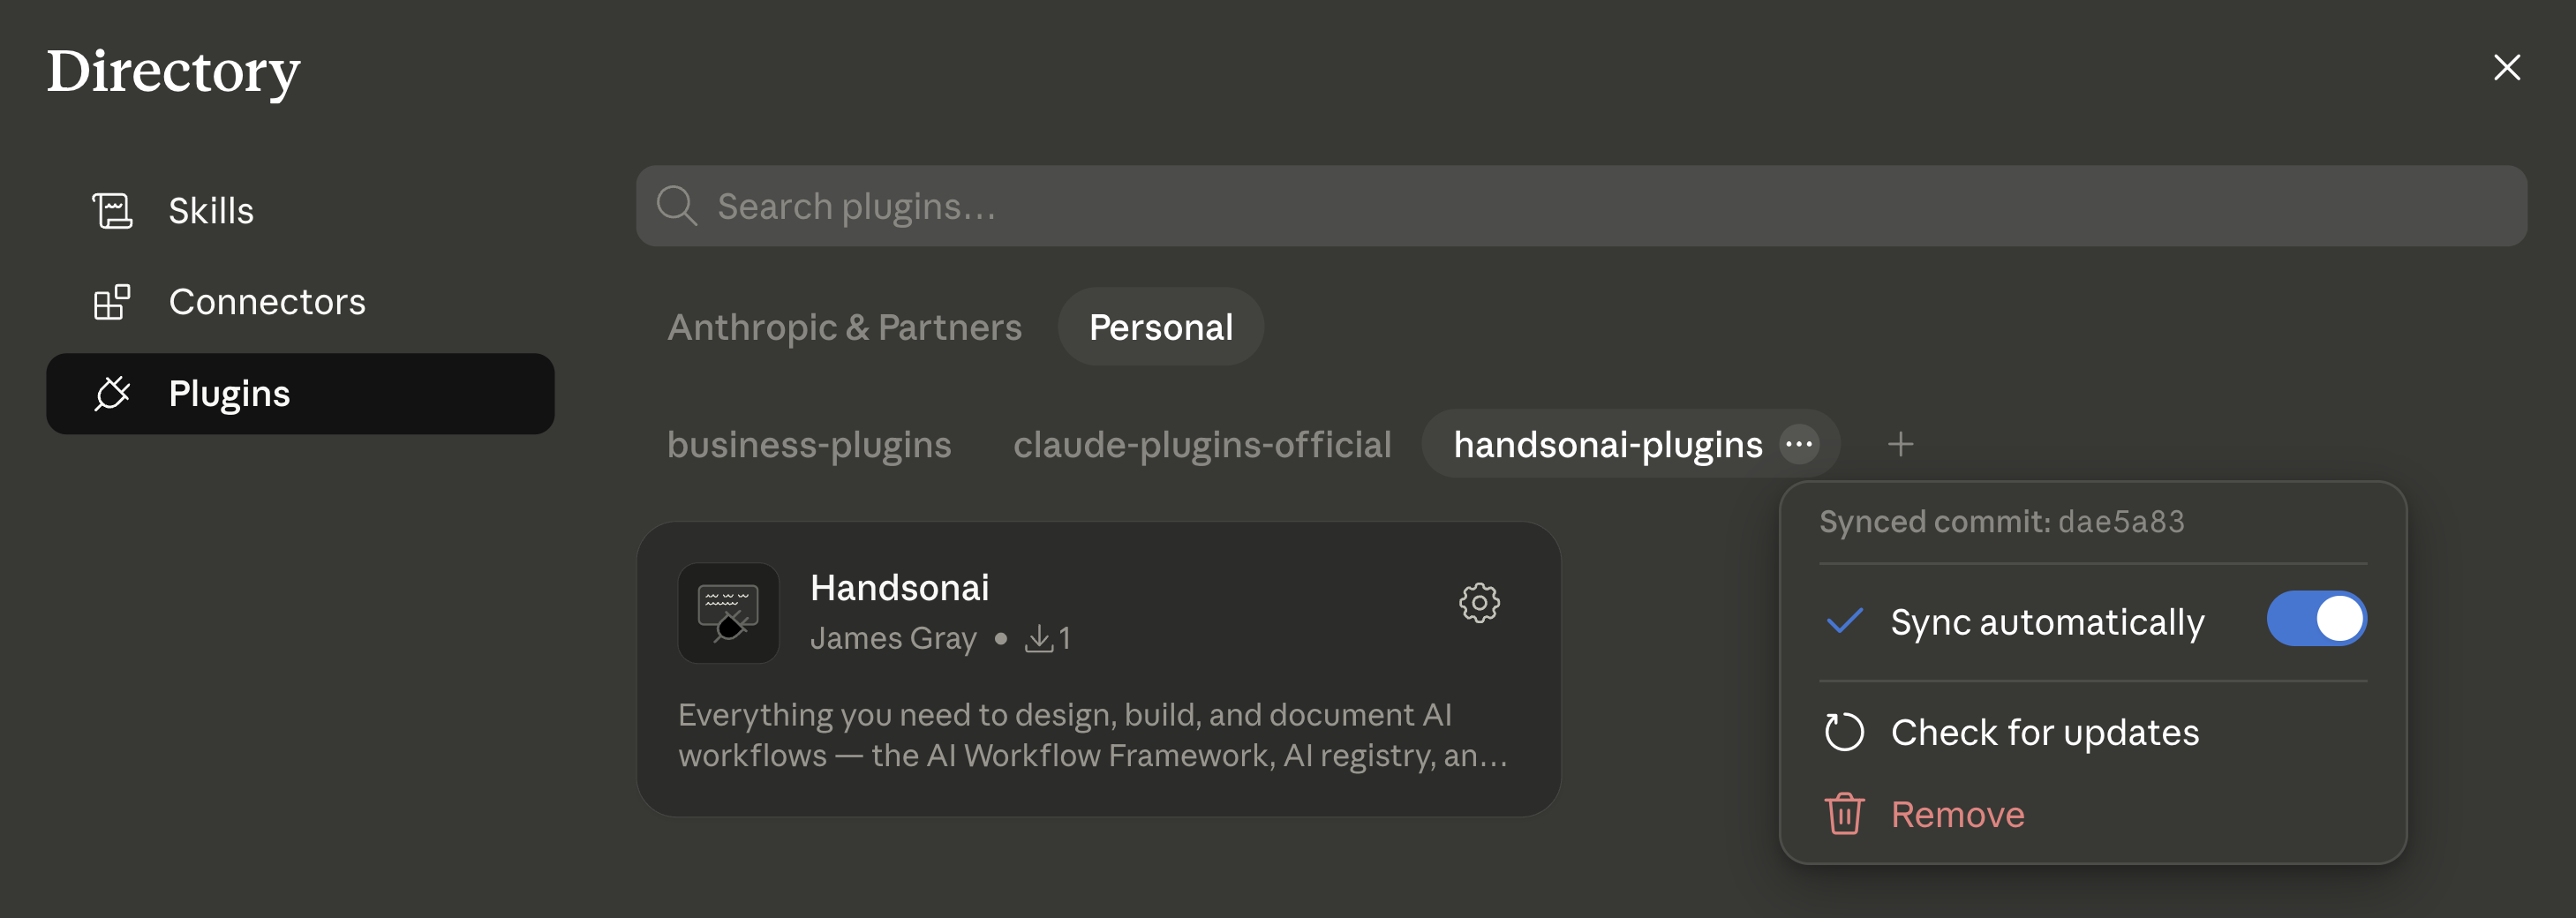
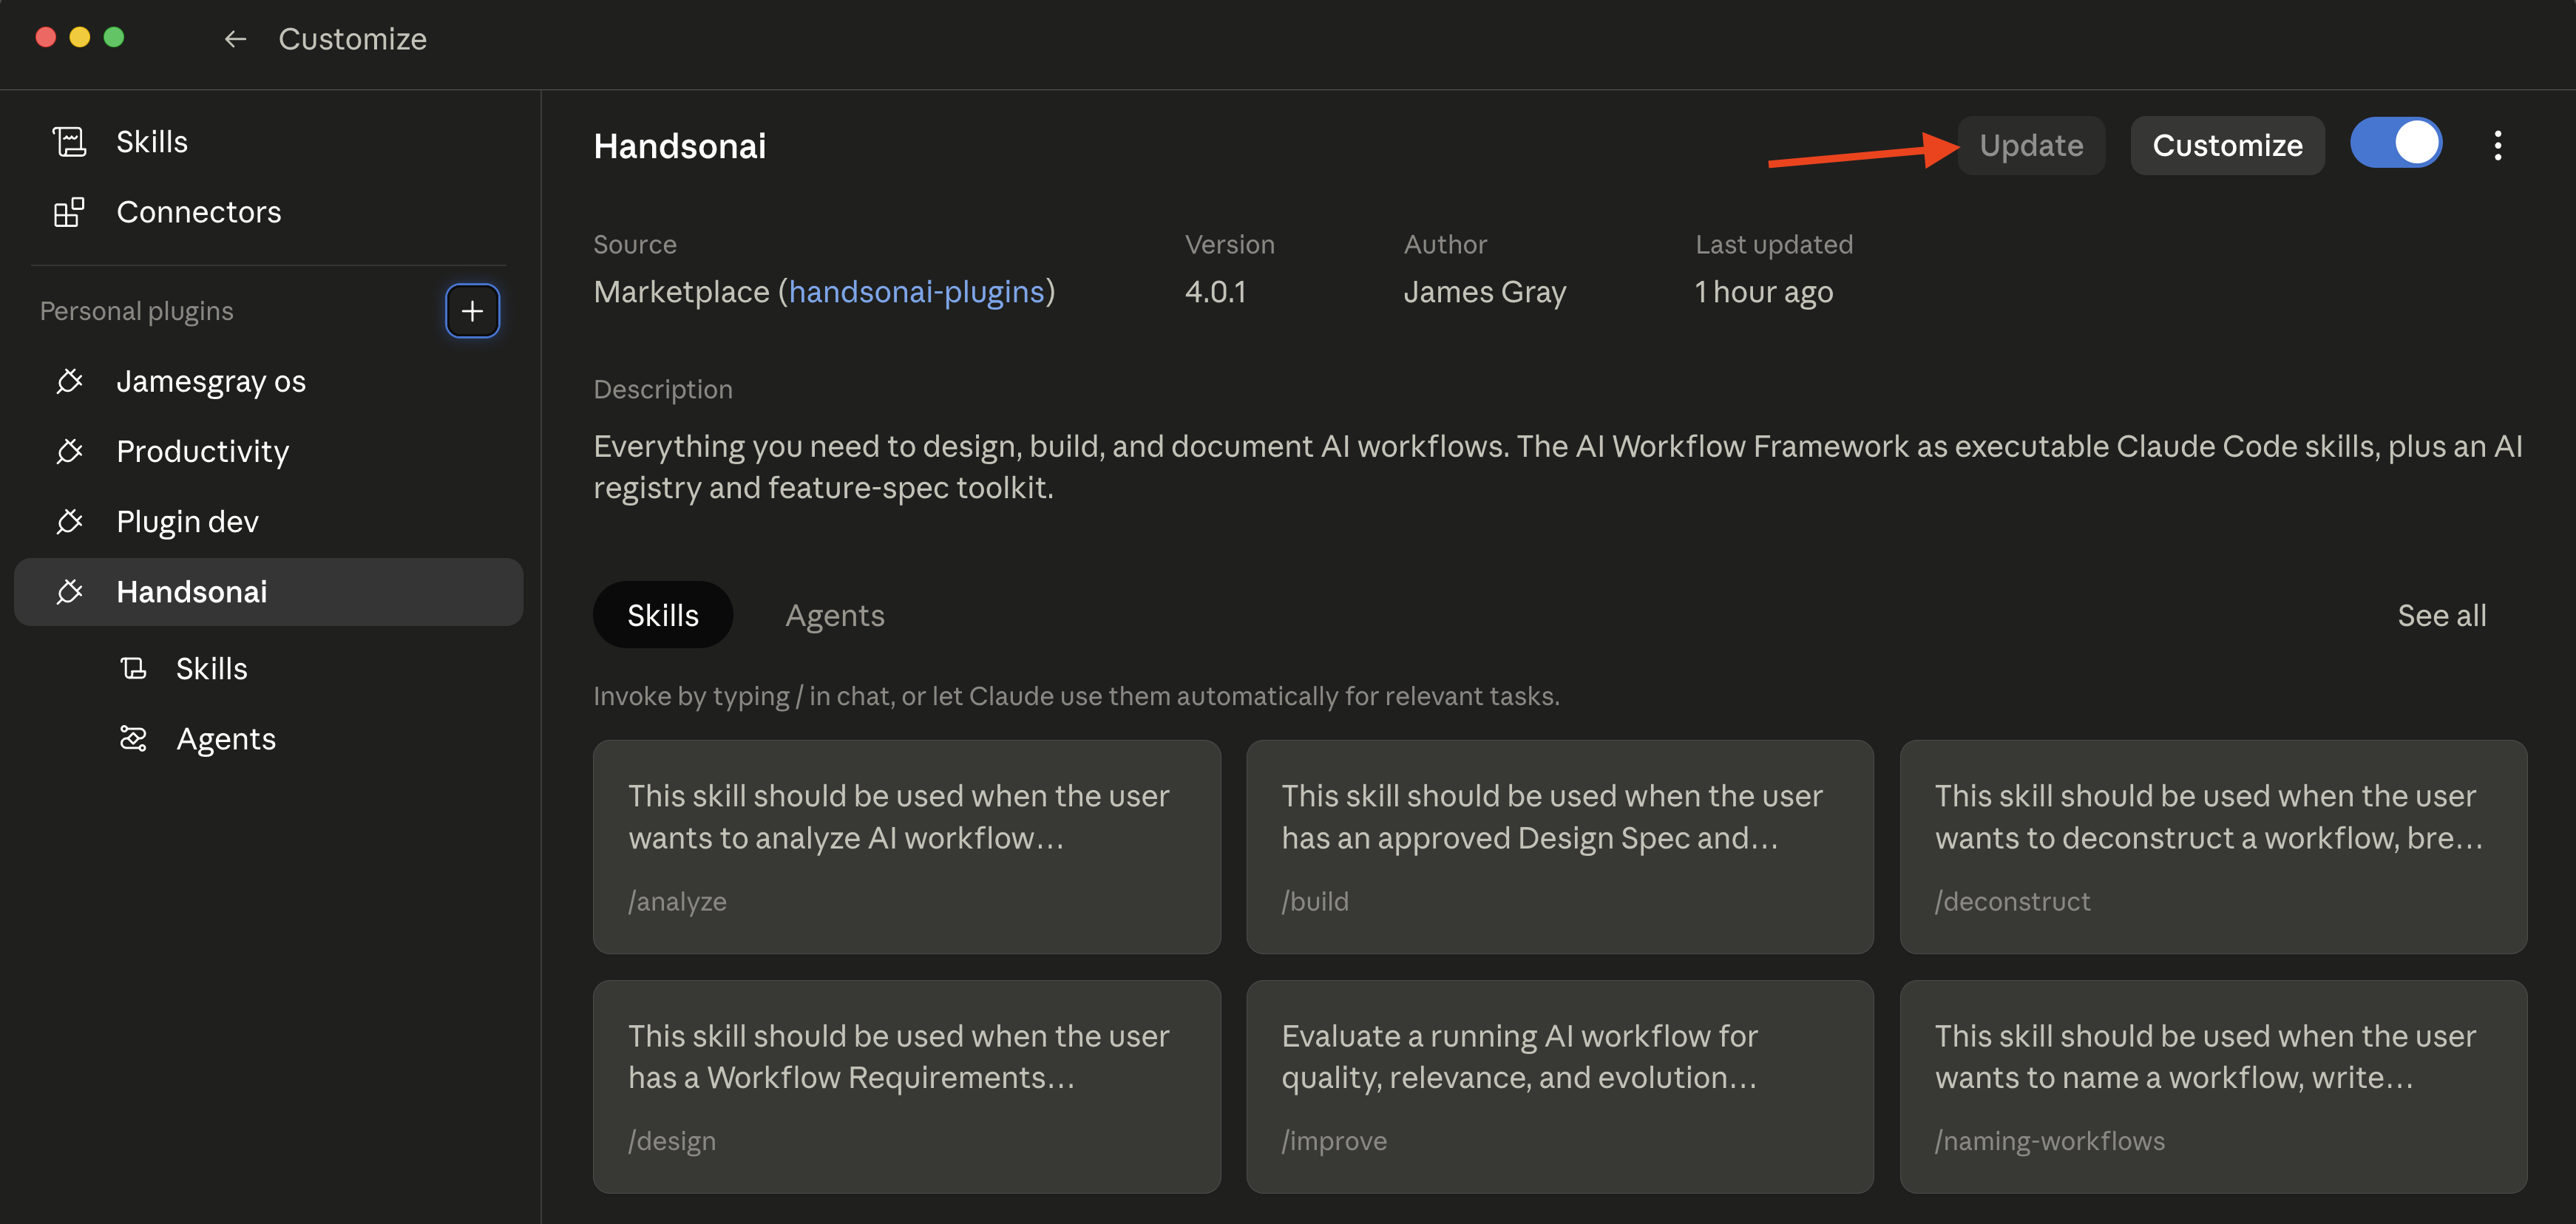
If you uploaded ZIPs: re-download the skill from the downloads table and upload it again via Customize → Skills → + → Create skill → Upload a skill. It replaces the existing skill of the same name. Only refresh the skills you actively use.
Claude Code
In the Code tab or your terminal, run:
/plugin update handsonai@handsonaiOr update every installed plugin at once with /plugin update --all. To have the marketplace refresh on startup, run /plugin → Marketplaces tab → handsonai → Enable auto-update. See Using Plugins → Enabling auto-updates.
ChatGPT & Codex
If you installed the plugin: open Plugins, find the handsonai-plugins marketplace, and choose Check for updates (or Sync), then update Hands-on AI. Workspace-managed marketplaces sync automatically every day. From the Codex CLI: codex plugin marketplace upgrade, then start a new thread.
If you uploaded ZIPs: re-download the skill from the downloads table and upload it again under Plugins → Skills. If ChatGPT keeps the old copy alongside the new one, delete the old one.
Codex with folders on disk: replace the skill folder under ~/.agents/skills/ (or your project’s .agents/skills/) with the newly unzipped one, and start a new thread.
Google Gemini
Spark: re-download the skill, then Skills → More (⋮) next to the skill → Replace skill → choose the new ZIP.
Gemini Enterprise: upload the new ZIP with + → Upload skill → Import; if the old version is still listed on your Skills page, uninstall it there.
Microsoft 365 Copilot (Cowork)
Cowork keeps duplicates rather than replacing, so: open Customize → Skills, open the old skill and click Delete, then upload the new ZIP with Upload skill. If you used the OneDrive folder method, just overwrite the folder under Documents/Cowork/skills/. Cowork picks up the change on your next conversation.
Cursor, Gemini CLI / Antigravity
These tools read skills from a project folder, so refreshing means swapping the folder.
- Re-download the skill from the downloads table and unzip it.
- In your project, replace the existing skill folder under
.agents/skills/<skill>/(or.gemini/skills/<skill>/for Gemini) with the new one. - Restart the tool if it caches skill metadata (Cursor and Antigravity usually need a reopen; CLIs pick up changes on the next session).
Using These Skills
Section titled “Using These Skills”Once the skills are set up, here’s how to start on each platform. The same test works everywhere: ask “Help me analyze AI workflow opportunities” and you should get a short interview about your role and your work, not a generic answer.
| Platform | How to start |
|---|---|
| Claude — Chat & Cowork | Start a new chat and describe what you need — Claude picks the right skill. In Cowork, type / to see the skills listed. |
| Claude Code | Type /handsonai:analyze (or any slash command below), or describe your need. |
| ChatGPT | Switch to Work, type @analyze (or describe the task). In the Codex tab, type $analyze. |
| Google Gemini | Spark: type /analyze in a task, or describe it. Gemini Enterprise: @analyze or /analyze. |
| M365 Copilot | Start a Cowork conversation and describe what you need — Cowork loads the matching skill. |
| Cursor / Codex / Gemini CLI / Antigravity | Ask by skill name — “Use the analyze skill.” Skills are discovered automatically. |
Claude Code slash commands:
| Command | Skill |
|---|---|
/handsonai:analyze | Analyze — Step 1 |
/handsonai:deconstruct | Deconstruct — Step 2 |
/handsonai:design | Design — Step 3 |
/handsonai:build | Build — Step 4 |
/handsonai:test | Test — Step 5 |
/handsonai:run | Run — Step 6 |
/handsonai:improve | Improve — Step 7 |
What Each Skill Does
Section titled “What Each Skill Does”Each skill is documented in detail on its step page — including the run sequence, example prompts, and outputs. This page focuses on installation; the step pages are the single source of truth for what each skill actually does.
| Skill | Step page |
|---|---|
analyze | Step 1 — Analyze |
deconstruct | Step 2 — Deconstruct |
design | Step 3 — Design |
build | Step 4 — Build |
test | Step 5 — Test |
run | Step 6 — Run |
improve | Step 7 — Improve |
framework-agent | Run It All at Once: framework-agent — orchestrates all seven skills end-to-end (Claude Cowork and Claude Code, via the plugin) |
What if I lose context mid-conversation?
The file-based handoffs between steps mean you can continue in a new conversation. Just invoke the next skill and point it at the file from the previous step (e.g., “Use deconstruct on outputs/lead-qualification-requirements.md”).
Do I need Claude Code for all of this? No. These skills work on Claude (Chat, Cowork, and Code), ChatGPT and Codex, Google Gemini (Spark, Gemini Enterprise, Gemini CLI, and Antigravity), Microsoft 365 Copilot, and Cursor. See Set Up These Skills above for your platform.
Plugin or ZIPs — which should I use?
The plugin, if your platform and plan allow it: one install, one-click updates, and on Claude it includes the framework-agent orchestrator. ZIPs are the fallback for every other situation and work just as well for the seven skills themselves.